


How to Teach Kids to Throw a Football, Step by Step
Your quarterback just threw a pass that went sideways. Not incomplete — sideways. The ball left his hand flat, wobbled ten feet to the left, and died in the grass while the receiver stood there wondering what happened.
Welcome to coaching kids. Almost every young player throws like this at first: a sidearm fling, no step, the arm doing all the work. The good news is that throwing is the most teachable skill in flag football. It breaks into pieces small enough for a seven-year-old, and you can watch it improve inside a single practice.
You don't need to have been a quarterback. You just need the checkpoints, in order.
What "good enough" looks like (calibrate first)
Before you touch mechanics, reset your expectations. Most new coaches aim way too high, way too early, then get frustrated when a six-year-old throws like a six-year-old. The distances below are rough guides, not milestones. Kids vary wildly.
- Ages 5–6: The ball goes roughly forward and roughly over the top instead of sidearm. If it reaches a partner five yards away, that's a win. Spirals are a rumor at this age.
- Ages 7–8: Ten-yard throws with an actual step toward the target. Still wobbly. That's fine.
- Ages 9–10: Fifteen to twenty yards, and you'll start seeing a real spiral now and then. Accuracy is still a coin flip.
- Ages 11+: Distance and accuracy both show up. Now you're refining, not building.
The point: you're not building a quarterback. You're building a kid who can get the ball ten yards to a teammate without it looking like an accident. Everything else is bonus.
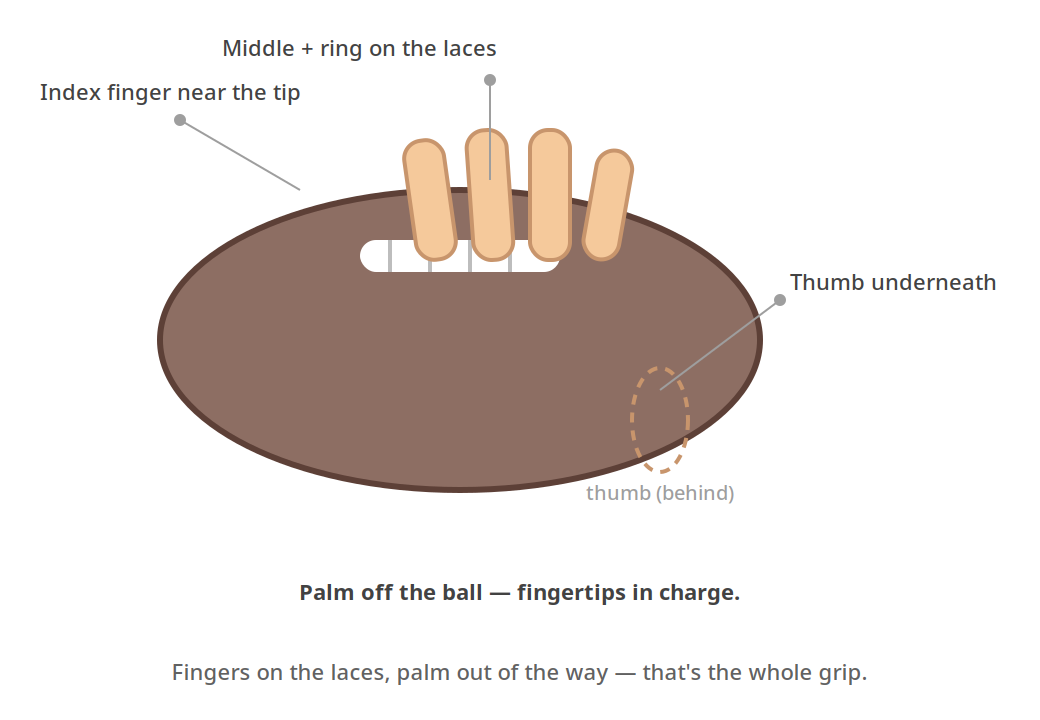
The grip: fingers on laces, fingertips in charge
Hand the kid a ball and watch what they do. Most grab it like a watermelon, whole palm wrapped around it, fingers wherever they land. That's the death grip, and it's flaw number one before they even move.
The fix takes thirty seconds to teach:
- Fingers across the laces. Middle and ring fingers sit on the laces themselves. Index finger rides just ahead of them, near the tip of the ball. Thumb goes underneath, on the opposite side, for support.
- Fingertips, not palm. The ball sits in the fingers and thumb. The palm barely touches it. That's what lets the ball spin off the hand instead of tumbling out of a fist.
You may hear coaches talk about the "two-finger gap": the idea that you should fit two fingers between your palm and the ball. The phrase is just shorthand for the real point: if the palm is glued to the ball, the kid can't get any spin on it. Fingertips do the work. Palm stays out of the way.
USA Football's player progression materials list "fingers on laces" as the first grip checkpoint, and every youth throwing progression starts in the same place. It's consensus for a reason: the grip is the cheapest fix in football. Get this right and everything downstream gets easier.
One practical note: use the right ball. A kid with small hands trying to grip a full-size ball will palm it no matter what you say. Leagues use age-appropriate sizes for a reason: Pee Wee or junior balls for younger kids. If the ball looks huge in their hands, it's too big.
The stance: sideways, not square
Kids naturally stand square to the target, like they're about to push something heavy. That kills the throw before it starts. No coil, no rotation, nothing to unwind.
Teach this instead:
- Feet shoulder-width apart. Athletic base, slight bend in the knees.
- Sideways to the target. The non-throwing shoulder points at the receiver. Right-handed kid, left shoulder aims at the target.
- Weight back, then forward. The throw starts with weight on the back foot and finishes on the front foot. That transfer is where the power lives — not in the arm.
USA Football's progression guide lists "feet shoulder-width apart" and "lead shoulder pointed at the target" as the base checkpoints. Same two cues, everywhere you look.
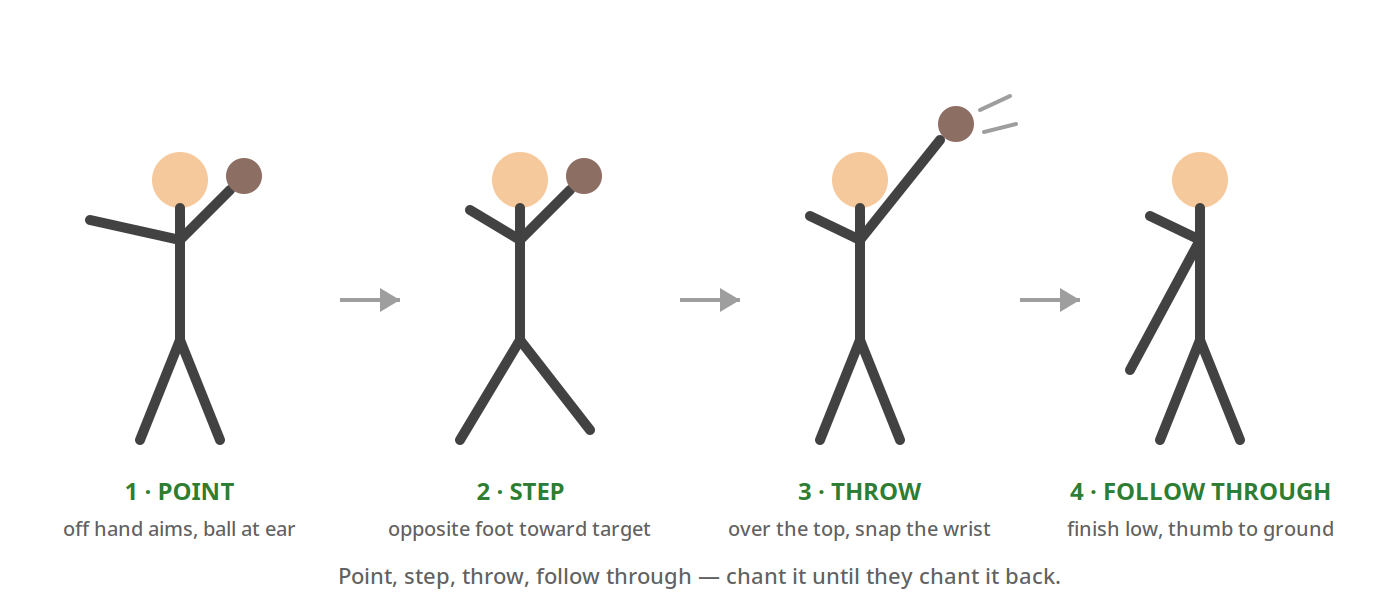
The motion: four checkpoints
Here's the whole thing. Four words, in order: point, step, throw, follow through. It's the most-used throwing cue in youth coaching. It shows up in league drill manuals and PE curriculums teaching the same motion. Teach it as a chant. Kids remember chants.
1. POINT. The non-throwing hand points at the target. This does two jobs: it aims the body, and it keeps the front shoulder closed until the right moment. Ball stays up by the ear, elbow bent: the "L" shape. USA Football's mechanics checkpoints describe the arm path as moving from a horizontal "L" to a vertical "L." Same idea, fancier words.
2. STEP. Step toward the target with the foot opposite the throwing arm. Right-handed thrower, left foot steps. This is the checkpoint most kids skip, and it's the one that matters most. The step is what gets the hips and shoulders rotating, and rotation is where real power comes from. No step, no power, all arm.
3. THROW. The arm comes forward and over the top, not around the side. Elbow leads, the forearm whips through, and the wrist snaps at release to put spin on the ball. It's the same motion as throwing a baseball. Every youth drill manual says exactly that, because it's true, and because most kids have thrown a baseball (or a rock) before.
4. FOLLOW THROUGH. The throwing hand finishes down and across, toward the target. USA Football's cue is "thumb to ground." One old coaching drill tells kids to exaggerate it like they're reaching down to pick up grass. It feels silly. It works. A kid who follows through throws spirals; a kid who stops at release throws wobblers.
Teach it in order, one checkpoint at a time. Don't dump all four on a kid at once. Get the grip and the point down, then add the step, then the throw, then the follow-through. Layer it across a practice, not a minute.
The 3 flaws you'll see (and the one-sentence fix for each)
You don't need to diagnose twelve things. Ninety percent of bad kid throws are one of these three:
1. The sidearm fling. The ball comes out flat and sideways, end over end. Fix: "Ball by your ear, throw over the top, like you're reaching for something on a high shelf."
2. No step. The kid stands flat-footed and throws with just the arm. The ball goes nowhere. Fix: "Step at your target with your other foot. The step is the throw."
3. The death grip. Palm wrapped around the ball, fingers buried, ball tumbles out with zero spin. Fix: "Fingertips on the laces. Let the ball sit in your fingers, not your palm."
Pick ONE flaw per kid per practice. The kid with all three problems? Fix the grip first (it's the cheapest), then the step, then the arm path. One thing at a time is how mechanics actually change.
4 partner drills, in order
Run these as a progression. Each one isolates a piece, then you put the pieces together.
Drill 1: Knee throws (isolate the arm). Partners face each other about 8–10 yards apart, both down on one knee, throwing-side knee down. Throw back and forth using only the upper body; no legs allowed. This is the standard opening drill in youth throwing progressions for a reason: with the legs taken away, the kid has to use the arm path and follow-through correctly. Two minutes, then switch. (Start both knees down for the youngest kids, then go to one knee.)
Drill 2: Wrist flicks (learn the spin). Partners 8–10 feet apart. Thrower tucks the throwing elbow against the body and flicks the ball to the partner using only the wrist, no arm swing at all. The goal isn't distance; it's getting the ball to spin. Fifteen good flicks each. This is the drill that teaches the spiral, and most kids have never felt a ball come off their fingertips correctly until they do it.
Drill 3: Step-and-throw (add the legs). Partners stand 10 yards apart, feet shoulder-width, sideways to the target. Now the full chant: point, step, throw, follow through. Call the checkpoints out loud for the first few reps ("POINT... STEP... THROW!"), then let them run it. Watch the feet, not the ball. If the step is right, the throw is usually right.
Drill 4: Back up and move (make it real). Partners keep throwing and take one big step back after every clean catch. Drop one, hold your ground — the pair only advances on completions. This turns mechanics into a game, stretches distance naturally, and teaches kids to adjust as the target moves. Cap it around 20 yards for younger kids; let the older ones stretch it out.
All four take about 10–15 minutes. That's a warmup, not a practice segment, and that's the point.
The other half of the play: teach your center to snap
Every throw in this article starts one second earlier: with the snap. A quarterback can't do anything with a ball that arrives at his ankles, and at the youth level the center-quarterback exchange fumbles more plays than any defense ever will. The good news: it's a ten-minute teach.
What the center actually does. The center starts every play, so pick a reliable kid, not a leftover. Job description: snap the ball cleanly to the quarterback, then immediately run a route. In flag football the center is an eligible receiver, and the kid who sprints out after snapping is open more often than anyone on the field. Snap-and-release is a weapon, not a formality.
The snap, step by step (shotgun):
- Ball on the ground, one hand on top. Fingers spread across the laces, same grip as throwing. The other hand can rest on a knee for balance.
- Look between the legs. Or, for the youngest kids, a quick glance back is fine. Accuracy first, style later.
- Snap it like a throw. One smooth motion back between the legs, wrist flicking so the ball spirals. A spiral snap arrives in the quarterback's hands; a wobbly one arrives somewhere near them.
- Target: the quarterback's chest. Not his feet, not over his head. Chest-high, every time.
The quarterback's half. QB stands about four yards back, head up, both hands up at chest height like a target, never looking down at the ball before it arrives. Use one cadence all season ("Ready... GO!") so the center snaps on the same word every play. Most botched exchanges are timing, not hands: the center went on "ready" and the QB was still looking at the receivers.
Rep it like this: pair every center with a quarterback for two minutes before plays at each practice: ten snaps, switch, ten more. Young league using a direct handoff or a side toss instead of a through-the-legs snap? Even better: same pairing, same reps, and the whole exchange takes one practice to become automatic.
Pick two centers, not one. Kids get sick, kids go on vacation, and the play literally cannot start without this kid.
How much to practice: a little, every time
Don't run a "throwing day." It doesn't work. Kids get bored, arms get tired, and the mechanics fade by next week.
Make throwing part of the warmup at every practice instead. Ten minutes of partner throwing while kids are arriving and settling in, before the real drills start. The repetition compounds: fifty decent throws a week beats two hundred sloppy ones once a month. Youth throwing progressions are literally designed as warmup routines: short, repeatable, every session.
And send it home. You're already texting the parents after practice, add one line: "Five minutes of catch in the backyard, twice this week. That's it." The kids who throw at home are the kids whose mechanics stick. You're not assigning homework. You're giving parents the easiest win in youth sports: playing catch with their kid.
That's the whole system. Grip, stance, four checkpoints, three fixes, four drills, ten minutes a practice. You don't need a quarterback background. You need the order — and now you have it.
Your Next Step
The Center–QB Exchange →
The other half of every pass play: teach the snap so the throw can happen.
Your First Practice: A Minute-by-Minute Script →
Where throwing reps fit inside your first practice, station by station.